Dart 생태계는 라이브러리나 툴 같은 소프트웨어를 공유하기 위해 패키지를 사용합니다. 이 페이지는 가장 일반적인 패키지인 라이브러리 패키지에 초점을 맞춰 패키지 생성 방법을 알려줍니다.
새로운 패키지 생성
생성할 패키지의 초기 디렉토리와 구조를 만들고 싶다면,
dart create 커맨드와 package 템플릿을 사용하세요:
$ dart create -t package <PACKAGE_NAME>
라이브러리 패키지를 구성하는 것
다음은 다이어그램은 간단한 라이브러리 패키지의 레이아웃을 나타냅니다:

라이브러리를 위한 최소한의 요구사항은 다음과 같습니다:
- pubspec 파일
- 라이브러리의
pubspec.yaml파일은 애플리케이션의pubspec.yaml과 같습니다.pubspec.yaml파일에는 이 패키지가 라이브러리라고 명시되어 있지 않습니다. - lib 디렉토리
- 예상대로 라이브러리의 코드는 lib 디렉토리 아래에 있으며 다른 패키지에 대해서는 공개되어 있습니다.
필요에 따라 lib에서 파일 계층을 임의로 만들 수 있습니다.
관례에 따라 구현 코드는 lib/src 아래에 위치합니다.
lib/src 에 잇는 코드들은 private로 간주됩니다.
다른 패키지는
src/...디렉토리에서 코드를 가져올 필요가 없습니다. lib/src 디렉토리의 API 공개는 lib/scr 디렉토리의 파일을 lib 디렉토리의 파일로 내보냄으로써 달성됩니다.
라이브러리 패키지 구성
미니 라이브러리 라고 하는 작고 독립된 라이브러리를 만들 때는 라이브러리 패키지의 유지 관리, 확장 및 테스트가 매우 쉽습니다. 대부분의 경우, 각 클래스가 밀접하게 결합된 상황이 아닌 한 자신을 미니 라이브러리로 간주해야 합니다.
모든 공개 API를 내보내는 lib/<package-name>.dart의 “main” 라이브러리 파일을 lib 디렉토리에 직접 만드세요. 이를 통해 사용자는 하나의 파일을 가져오면 라이브러리의 모든 기능을 사용할 수 있습니다.
lib 디렉토리는 src 라이브러리 외에도 다른 중요한 것들을 가지고 있습니다.
예를 들어, 메인 라이브러리가 크로스 플랫폼이지만, 생성된 독립 라이브러리는
dart:io 또는 dart:html에 의존할 수도 있습니다.
몇몇 패키지들은 프리픽스를 사용하여 가져와야하는 독립된 라이브러리와 그렇지 않은
메인 라이브러리를 가집니다.
다음으로 shelf라는 실제 라이브러리 패키지의 구조를 살펴봅시다. shelf 패키지는 Dart를 사용하여 웹 서버를 쉽게 만들 수 있는 방법을 제공하고, Dart 라이브러리 패키지에서 자주 사용되는 구조를 가지고 있습니다:

lib 바로 아래에 메인 라이브러리 파일인 shelf.dart는
lib/src의 여러 API 파일들을 내보냅니다.
과도하게 API를 내보내지 않고 개발자에게 공개 API의 개요를 제공하기 위해
shelf.dart는 show를 사용하여 내보낼 코드를 지정합니다.
export 'src/cascade.dart' show Cascade;
export 'src/handler.dart' show Handler;
export 'src/hijack_exception.dart' show HijackException;
export 'src/middleware.dart' show Middleware, createMiddleware;
export 'src/middleware/add_chunked_encoding.dart' show addChunkedEncoding;
export 'src/middleware/logger.dart' show logRequests;
export 'src/middleware_extensions.dart' show MiddlewareExtensions;
export 'src/pipeline.dart' show Pipeline;
export 'src/request.dart' show Request;
export 'src/response.dart' show Response;
export 'src/server.dart' show Server;
export 'src/server_handler.dart' show ServerHandler;
shelf 패키지는 shelf_io라는 미니 라이브러리를 포함하고 있습니다.
이 어댑터는 dart:io의 HttpRequest 객체를 처리합니다.
라이브러리 파일 가져오기
다른 패키지에서 라이브러리 파일을 임포트할 때,
package: 명령어로 파일의 URI를 지정하세요.
import 'package:utilities/utilities.dart';
작성하고 있는 패키지의 라이브러리 파일을 가져오고 싶다면
두 파일 모두 lib 디렉토리에 있거나 lib 디렉토리 밖에 있을 때,
상대 경로로 라이브러리 파일을 가져올 수 있습니다.
Import되는 파일이 lib에 있고 import하는 파일이 밖에 있다면, package:를 사용하여 가져오세요.
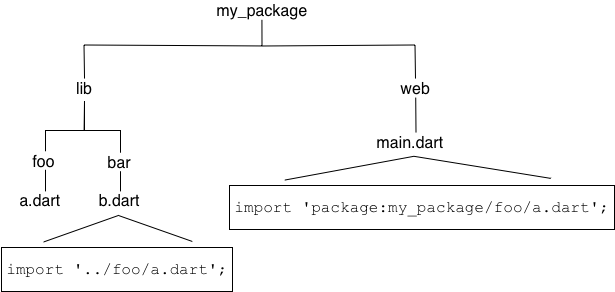
다음 그림은 web과 lib에서 lib/foo/a.dart를 가져오는 방법을 보여줍니다.
라이브러리 파일을 조건부로 가져오고 내보내기
라이브러리가 멀티 플랫폼을 지원한다면, 라이브러리 파일을 조건부로 가져오고 내보내는 것이 필요합니다. 웹과 네이티브 플랫폼을 모두 지원하는 라이브러리가 흔한 예시입니다.
조건부로 내보내고 가져오고 싶다면,
dart:* 라이브러리가 존재하는지 확인해야합니다.
다음은 dart:io과 dart:html의 존재 여부를 확인하는
조건부 내보내기의 예제입니다:
export 'src/hw_none.dart' // 스텁 구현
    if (dart.library.io) 'src/hw_io.dart' // dart:io 구현
if (dart.library.html) 'src/hw_html.dart'; // dart:html 구현코드 설명은 다음과 같습니다:
- 커맨드 라인 앱 처럼
dart:io를 사용하는 앱은src/hw_io.dart를 내보냅니다. -
dart:html를 사용하는 웹앱은src/hw_html.dart를 내보냅니다. - 모두 해당하지 않는다면,
src/hw_none.dart를 내보냅니다.
파일을 조건부로 가져오고 싶다면, 위의 코드에서 export를 import로 교체하세요.
조건부로 내보낸 모든 라이브러리는 동일한 API를 구현해야 합니다.
예를 들어, 다음 dart:io 구현을 살펴봅시다:
import 'dart:io';

void alarm([String? text]) {
  stderr.writeln(text ?? message);
}

String get message => 'Hello World from the VM!';다음은 UnsupportedError를 발생시키는 스텁을 사용하는 기본 구현입니다:
void alarm([String? text]) => throw UnsupportedError('hw_none alarm');

String get message => throw UnsupportedError('hw_none message');모든 플랫폼에서 조건부 내보내기 코드를 가지고 있는 라이브러리를 가져오는 것이 가능합니다:
import 'package:hw_mp/hw_mp.dart';

void main() {
  print(message);
}
Providing additional files
A well-designed library package is easy to test.
We recommend that you write tests using the
test package,
placing the test code in the test directory at the
top of the package.
If you create any command-line tools intended for public consumption,
place those in the bin directory, which is public.
Enable running a tool from the command line, using
dart pub global activate.
Listing the tool in the
executables section
of the pubspec allows a user to run it directly without calling
dart pub global run.
It’s helpful if you include an example of how to use your library.
This goes into the example directory at the top of the package.
Any tools or executables that you create during development that aren’t for
public use go into the tool directory.
Other files that are required if you publish your library to the
pub.dev site, such as README.md and CHANGELOG.md, are
described in Publishing a package.
For more information on how to organize a package directory,
see the pub package layout conventions.
Documenting a library
You can generate API docs for your library using
the dart doc tool.
dart doc parses the source looking for
documentation comments,
which use the /// syntax:
/// The event handler responsible for updating the badge in the UI.
void updateBadge() {
  ...
}
For an example of generated docs, see the shelf documentation.
To include any library-level documentation in the generated docs,
add a library directive and attach the comment directly above it.
For the how-and-why of documenting libraries, see
Effective Dart: Documentation.
Distributing an open source library
If your library is open source, we recommend sharing it on the pub.dev site. To publish or update the library, use pub publish, which uploads your package and creates or updates its page. For example, see the page for the shelf package. See Publishing a package for details on how to prepare your package for publishing.
The pub.dev site not only hosts your package, but also generates and hosts your package’s API reference docs. A link to the latest generated docs is in the package’s About box; for example, see the shelf package’s API docs. Links to previous versions’ docs are in the Versions tab of the package’s page.
To ensure that your package’s API docs look good on the pub.dev site, follow these steps:
- Before publishing your package, run the
dart doctool to make sure that your docs generate successfully and look as expected. - After publishing your package, check the Versions tab to make sure that the docs generated successfully.
- If the docs didn’t generate at all,
click failed in the Versions tab to see the
dart docoutput.
Resources
Use the following resources to learn more about library packages:
- Libraries and imports covers using library files.
- The package documentation is useful, particularly the package layout conventions.
- What not to commit covers what should not be checked into a source code repository.
- The newer library packages under the dart-lang organization tend to show best practices. Consider studying these examples: dart_style, path, shelf, source_gen, and test.